How to…
Do you want to improve your ZPUI app or solve your problem by copy-pasting a snippet in your app code? This page is for you =)
Basics
What’s the minimal ZPUI app?
In app/main.py:
menu_name = "Skeleton app"

# These two variables will be automatically assigned by init_app
# unless you define your own init_app. However, you do need to define them
# - for now, just for readability.
i = None #Input device
o = None #Output device

def callback():
    #Gets called when app is selected from menu
    pass
app/__init__.py has to be an empty file:
“Hello, world!”
In app/main.py:
menu_name = "Hello, world!"

# An UI element that does most of the legwork for us
from ui import PrettyPrinter as Printer

i = None #Input device
o = None #Output device

def callback():
    # will show text on screen for 3 seconds and then exit
    Printer("Hello, world!", i, o, 3)
What’s the minimal class-based app?
In app/main.py:
from apps import ZeroApp

class YourGreatApp(ZeroApp):
    menu_name = "Skeleton app"

    def on_start():
        #Gets called when app is selected from menu
        pass
app/__init__.py has to be an empty file, as with the previous example.
Experiment with ZPUI code
You can use the sandbox app to try out ZPUI code. First, stop the system-wide ZPUI
process if it’s running (use sudo systemctl stop zpui). Then, run this in the
install folder:
sudo python main.py -a apps/example_apps/sandbox
[...]
Python 2.7.13 (default, Nov 24 2017, 17:33:09)
[GCC 6.3.0 20170516] on linux2
Type "help", "copyright", "credits" or "license" for more information.
(InteractiveConsole)
>>>
Available variables:
>>> dir()
['__builtins__', '__code__', '__doc__', '__file__', '__name__', '__package__',
'callback', 'context', 'i', 'init_app', 'menu_name', 'o', 'set_context']
In short, you get i, o, a context object, and you can import all the
usual things you’d import in your app - like UI elements
>>> from ui import Canvas
>>> c = Canvas(o, interactive=True)
>>> c.centered_text("Hello world!")

User-friendliness
Whether your app involves a complex task, a task that could be done in multiple different ways or just something plain and simple, there are UI elements, functions and snippets that can help you make your app more accessible to the user.
Confirm a choice
In case you’re unsure the user will want to proceed with what you’re doing, you might want them to confirm their actions. Here’s how to ask them that:
from ui import DialogBox

message = "Are you sure?"
choice = DialogBox ('ync', i, o, message=message, name="HDD secure erase app erase confirmation").activate()
if choice:
    erase_hdd(device_path)
By default, Yes returns True, No returns False and Cancel returns None.
Pick one thing out of many
If you have multiple things and you need your user to pick one, here’s how to let them choose:
from ui import Listbox, PrettyPrinter
...
# You pass lists of two elements - first one is the user-friendly label,
# second is something that your code can actually use
# (doesn't have to be a string)
lc = [["Kingston D4", "/dev/bus/usb/001/002"], ["Sandisk Ultra M3", "/dev/bus/usb/001/002"]]
# The user will want to know what is it you want them to choose;
# Showing a quick text message is a good way to do it
PrettyPrinter("More than one drive found, pick a flash drive", i, o, 5)
path = Listbox(lc, i, o, name="USB controller flashing app drive selection menu").activate()
if path: # if the user pressed left key to cancel the choice, None is returned
    print(path)
Note
If you autogenerate the listbox contents from an external source (for example, your user needs to pick one flash drive from a list of all connected flash drives), it’s best if you check that the user really has any choice in the matter - as in, maybe there’s only one flash drive connected?
Enable/disable options
If you want user to be able to enable or disable settings or let them filter through a really long list of options to choose from, here’s what you can do:
from ui import Checkbox
...
# You pass lists of two/three elements - first one is the user-friendly label
# second is something that you'll receive as a response dictionary key,
# and you can optionally add the third element telling the default state
# (True/False)
# (doesn't have to be a string)
cc = [["Replace files that were changed", "replace_on_change", config["replace_on_change"]],
      ["Delete files from destination", "delete_in_destination", config["delete_in_destination"]],
      ["Save these settings", "save_settings"]]
choices = Checkbox(cc, i, o, name="Backup app options dialog").activate()
if choices: # if the user pressed left key to cancel the choice, None is returned
    print(choices)
# {"replace_on_change":True, "delete_in_destination":False, "save_settings":False}
Indicate progress
If you’re going to launch a background task, it’s best if the user knows what’s happening. The simplest way is to print something on the screen:
from ui import PrettyPrinter
...
PrettyPrinter("Scanning ports", i, o, 5)
results = scan_ports()
print_results(results)
Or, a little bit prettier:
from ui import Canvas
...
c = Canvas(o)
c.centered_text("Scanning ports")
c.display()
results = scan_ports()
print_results(results)
Or, even better - use a LoadingIndicator UI element, which is much prettier and user-friendly:
from ui import LoadingIndicator
...
with LoadingIndicator(i, o, message="Scanning ports"):
    results = scan_ports()
print_results(results)
What if you actually know how much of the task is completed? Then, you can use a ProgressBar, which is going to show the user a percentage of the task completed:
from ui import ProgressBar
...
ports = [22, 23, 80, 111, 443]
with ProgressBar(i, o, message="Scanning ports") as pb:
    process = PortScanner(ports)
    process.start()
    while process.is_ongoing():
        current_port_index = ports.index(process.current_port)
        # Calculating progress from 0 to 100
        progress = int( 100.0/len(ports) * current_port_index )
        pb.progress = progress
print_results(results)
Pick a file/directory
In case your user needs to work with files, here’s how you can make the file picking process easy for them:
from ui import PathPicker
...
# You might already have some kind of path handy - maybe the one that your user
# picked last time?
path = os.path.split(last_path)[0] if last_path else '/'
new_path = PathPicker(path, self.i, self.o, name="Shred app file picker").activate()
if new_path: # As usual, the user can cancel the selection
    self.last_path = new_path # Saving it for usability
The PathPicker also supports a callback attribute which, instead of
letting the user pick one file and returning it, lets the user just click on
files and calls a function on each one of them as they’re selected. An example
of this working is the “File browser” app in “Utils” category of the main menu.
Allow exiting a loop on a keypress
Say, you have a loop that doesn’t have an UI element in it - you’re just doing something
repeatedly. You’ll want to let the user exit that loop, and the reasonable way is to
interrupt the loop when the user presses a key (by default, KEY_LEFT).
Here’s how to allow that:
from helpers import ExitHelper
...
eh = ExitHelper(i).start()
while eh.do_run():
    ... #do something repeatedly until the user presses KEY_LEFT
Stopping a foreground task on a keypress
If you have some kind of task that’s running in foreground (say, a HTTP server), you will
want to let the user exit the UI, at least - maybe even stop the task. If a task can be
stopped from another thread, you can use ExitHelper, too - it can call a custom function
that would signal the task to stop.
from helpers import ExitHelper
...
task = ... # Can be run in foreground with ``task.run()``
# Can also be stopped from another thread with ``task.stop()``
eh = ExitHelper(i, cb=task.stop).start()
task.run() # Will run until the task is not stopped
Draw on the screen
Display an image
You can easily draw an image on the screen with ZPUI. The easiest way is
by using the display_image method of OutputProxy object:
o.display_image(image) #A PIL.Image object
However, you might want a user-friendly wrapper around it that would allow
you to easily load images by filename, invert, add a delay/exit-on-key etc.
In this case, you’ll want to use the GraphicsPrinter UI element, which
accepts either a path to an image you want to display, or a PIL.Image
instance and supports some additional arguments:
from ui import GraphicsPrinter
...
# Will display the ZPUI splash image for 1 second
# By default, it's inverted
GraphicsPrinter("splash.png", i, o, 1)
# Same, but the image is not inverted
GraphicsPrinter("splash.png", i, o, 1, invert=False)
# Display an image from the app folder - using the local_path helper
GraphicsPrinter(local_path("image.png"), i, o, 1)
# Display an image you drew on a Canvas
GraphicsPrinter(c.get_image(), i, o, 1)
In case you have a Canvas object and you just want to display it, there’s a shorthand:
c.display()
Draw things on the screen - basics
Uou can use the Canvas objects to draw on the screen.
from ui import Canvas
...
c = Canvas(o) # Create a canvas
c.point((1, 2)) # Draw a point at x=1, y=2
c.point( ( (2, 1), (2, 3), (3, 4) ) ) # Draw some more points
... # Draw other stuff here
c.display() # Display the canvas on the screen

Draw text
You can draw text on the screen, and you can use different fonts. By default, a 8pt font is used:
c = Canvas(o)
c.text("Hello world", (0, 0)) # Draws "Hello world", starting from the top left corner
c.display()

You can also use a non-default font - for example, the Fixedsys62 font in the ZPUI font storage:
c.text("Hello world", (0, 0), font=("Fixedsys62.ttf", 16)) # Same, but in a 16pt Fixedsys62 font
c.text("Hello world", (0, 0), font=(local_path("my_font.ttf"), 16) ) # Using a custom font from your app directory
Draw centered text
You can draw centered text, too!
c = Canvas(o)
c.centered_text("Hello world") # Draws "Hello world" in the center of the screen
c.display()
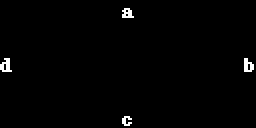
You can also draw text that’s centered on one of the dimensions:
c = Canvas(o)
ctc = c.get_centered_text_bounds("a") # Centered Text Coords
# ctc == Rect(left=61, top=27, right=67, bottom=37)
c.text("a", (ctc.left, 0))
c.text("b", (str(ctc.left-ctc.right), ctc.top)) # ('-6', 27)
c.text("c", (ctc.left, str(ctc.top-ctc.bottom))) # (61, '-10')
c.text("d", (0, ctc.top))
c.display()
Draw a line
c = Canvas(o)
c.line((10, 4, "-8", "-4")) # Draws a line from top left to bottom right corner
c.display()

Draw a rectangle
c = Canvas(o)
c.rectangle((10, 4, 20, "-10")) # Draws a rectangle in the left of the screen
c.display()

Draw a circle
c = Canvas(o)
c.circle(("-8", 8, 4)) # Draws a circle in the top left corner - with radius 4
c.display()

Note
There’s also a Canvas.ellipse() method, which takes four coordinates
instead of two + radius.
Invert a region of the screen
If you want to highlight a region of the screen, you might want to invert it:
c = Canvas(o)
c.text("Hello world", (5, 5))
c.invert_rect((35, 5, 80, 17)) # Inverts, roughly, the right half of the text
c.display()

Note
To invert the whole screen, you can use the invert method.
Make your app easier to support
Add logging to your app
In case your application does something more complicated than printing a sentence on the display and exiting, you might need to add logging - so that users can then look through the ZPUI history, figure out what was it that went wrong, and maybe submit a bugreport to you!
from helpers import setup_logger # Importing the needed function
logger = setup_logger(__name__, "warning") # Getting a logger for your app,
# default level is "warning" - this level controls logging statements that
# will be displayed (and saved in the logfile) by default.

...

try:
    command = "my_awesome_script"
    logger.info("Calling the '{}' command".format(command))
    output = call(command)
    logger.debug("Finished executing the command")
    for value in output.split():
        if value not in expected_values:
            logger.warning("Unexpected value {} found when parsing command output; proceeding".format(value))
except:
    logger.exception("Exception while calling the command!")
    # .exception will also log the details of the exception after your message
Add names to your UI elements
UI elements aren’t perfect - sometimes, they themselves cause exceptions. In this case,
we’ll want to be able to debug them, to make sure we understand what was it that went
wrong. Due to the nature of ZPUI and how multiple apps run in parallel, we need to be
able to distinguish logs from different UI elements - so, each UI element has a name
attribute, and it’s included in log messages for each UI element. By default, the
attribute is set to something non-descriptive - we highly suggest you set it
to tell:
- which app the UI element belongs to
- which part of the app the UI element is created
For example:
from ui import Menu
...
Menu(contents, i, o, name="Main menu of Frobulator app").activate()
Note
The only UI elements that don’t support the name attribute are Printers:
Printer, GraphicsPrinter and PrettyPrinter
Use failsafe item fetching
When working with dictionaries, it’s tempting to write straightforward
code that uses straightforward item fetching, like my_dict["key1"].
However, in certain cases this might fail - the most obvious one is, what if the dictionary
is outside of your control and you end up with a dict that doesn’t have the “key1” key?
It will throw KeyError, of course, stopping your code from reaching the goal.
Here’s how to fetch items from untrusted dictionaries:
value = my_dict.get("key1", "default_value")
Of course, it’s not needed everywhere, but it does make sense to do it when, say, working with user input, data generated by other software out of your control, and even config files (they’re there to be changed, which means they will be broken at some point). To sum up, this is a great trick for foolproofing your app.
Config (and other) files
Read JSON from a config file located in the app directory
You’ll want to configure your application from time to time - typically, to allow users to change your app’s configuration, but it’s also useful for storing user-specific data, allow other software to change your app’s configuration, or simply a way to hide all those magic numbers in your code out of plain sight.
JSON dictionaries are a good fit in that they convert to Python objects pretty easily - you can store strings, numbers, dictionaries and lists. A suggested config file for an app would be a dictionary (an “object” in JSON terms), here’s an example of how that could look like for a music player app, one to needs to store a few settings that were set by the user:
{
 "shuffle":true,
 "repeat":true,
 "last_directory":"/home/pi/music",
 "disabled_plugins":["lyrics", "thumbnails"]
}
Here’s the simplest way to read data from a config file located in an app’s directory:
from helpers import read_config, local_path_gen
config_filename = "config.json"

local_path = local_path_gen(__name__)
config = read_config(local_path(config_filename))
Do you have more requirements for your config file = like, easily saving it, restoring it on failure, as well as some primitive migrations as you update your app? The next example will probably work for your needs.
Read a config file with “restore to defaults on error”, migrations and save_config() method
There’s, however, a way to work with config files that you’re the most likely to use.
It allows you to read an app-specific config, restore it to defaults if the reading/parsing
fails for some reason and get a convenient save_config() method to save it.
from helpers import read_or_create_config, local_path_gen, save_config_gen
default_config = '{"your":"default", "config":"to_use"}' #has to be a string
config_filename = "config.json"

local_path = local_path_gen(__name__)
config = read_or_create_config(local_path(config_filename), default_config, menu_name+" app")
save_config = save_config_gen(local_path(config_filename))
To save the config, use save_config(config) from anywhere in your app.
Note
The faulty config.json file will be copied into a config.json.faulty
file before being overwritten
Warning
If you’re reassigning contents of the config variable from inside a
function, you will likely want to use Python global keyword in order
to make sure your reassignment will actually work.
In addition to that, if the highest level of your config is a dictionary, it allows you to perform small migrations - specifically, auto-adding new keys with default values to the config as your app is updated to rely on those.
Say, here’s a config you have, created from the default config and then changed by the user:
{
  "your":"non-default",
  "config":"to_use"
}
And here’s a new default config, with additional "but_now" key that you roll out through
an app upgrade:
default_config = '{"your":"default", "config":"to_use", "but_now":"its_updated"}'
The resulting config received from read_or_create_config will look like this:
{
  "your":"non-default",
  "config":"to_use",
  "but_now":"its_updated"
}
“Read”, “save” and “restore” - in a class-based app
from helpers import read_or_create_config, local_path_gen, save_config_method_gen
local_path = local_path_gen(__name__)

class YourApp(ZeroApp):

    menu_name = "My greatest app"
    default_config = '{"your":"default", "config":"to_use"}' #has to be a string
    config_filename = "config.json"

    def __init__(self, *args, **kwargs):
        ZeroApp.__init__(self, *args, **kwargs)
        self.config = read_or_create_config(local_path(self.config_filename), self.default_config, self.menu_name+" app")
        self.save_config = save_config_method_gen(self, local_path(self.config_filename))
To save the config, use self.save_config() from anywhere in your app class.
Get path to a file in the app directory
Say, you have a my_song.mp3 file shipped with your app. However, in order to use
that file from your code, you have to refer to that file using a path relative to the
ZPUI root directory, such as apps/personal/my_app/my_song.mp3.
Here’s how to get that path automatically, without hardcoding which folder your app is put in:
from helpers import local_path_gen
local_path = local_path_gen(__name__)
mp3_file_path = local_path("my_song.mp3")
In case of your app having nested folders, you can also give multiple arguments to
local_path():
song_folder = "songs/"
mp3_file_path = local_path(song_folder, "my_song.mp3")
Run tasks on app startup
How to do things on app startup in a class-based app?
def __init__(self, *args, **kwargs):
    ZeroApp.__init__(self, *args, **kwargs)
    # do your thing
Run a short task only once when your app is called
This is suitable for short tasks that you only call once, and that won’t conflict with other apps.
def init_app(input, output):
    # if we define our own init_app, we need to do this
    global i, o
    i = input; o = output
    init_hardware() #Your task - short enough to run while app is being loaded
Warning
If there’s a chance that the task will take a long time, use one of the following methods instead.
Run a task only once, first time when the app is called
This is suitable for tasks that you can only call once, and you’d only need to call once the user activates the app (maybe grabbing some resource that could conflict with other apps, such as setting up GPIO or other interfaces).
from helpers import Oneshot
...
def init_hardware():
    #can only be run once

#since oneshot is only defined once, init_hardware function will only be run once,
#unless oneshot is reset.
oneshot = Oneshot(init_hardware)

def callback():
    oneshot.run() #something that you can't or don't want to init in init_app
    ... #do whatever you want to do
Run a task in background after the app was loaded
This is suitable for tasks that take a long time. You wouldn’t want to execute that task
directly in init_app(), since it’d stall loading of all ZPUI apps, not allowing the user
to use ZPUI until your app has finished loading (which is pretty inconvenient for the user).
from helpers import BackgroundRunner
...
def init_hardware():
    #takes a long time

init = BackgroundRunner(init_hardware)

def init_app(i, o):
    ...
    init.run() #something too long that just has to run in the background,
    #so that app is loaded quickly, but still can be initialized.

def callback():
    if init.running: #still hasn't finished
        PrettyPrinter("Still initializing...", i, o)
        return
    elif init.failed: #finished but threw an exception
        PrettyPrinter("Hardware initialization failed!", i, o)
        return
    ... #everything initialized, can proceed safely
Context management
Contexts are the core concept of ZPUI multitasking. They allow you to switch between apps dynamically, use notifications, global hotkeys etc. One common usage of contexts would be creating menus that appear on a button press.
Get the context object
In order to interact with your app’s context object, you first need to get it. If your
app is a simple one (function-based), you need to add a set_context() method that
needs to accept a context object as its first argument. This function will be called
after init_app is called. In case of a class-based app, you need to have a
set_context() method in the app’s class. Once you get the context object, you
can do whatever you want with it and, optionally, save it internally. Here’s an example
for the function-based apps:
def set_context(received_context):
    global context
    context = received_context
    # Do things with the context
Here’s an example for the class-based apps:
def set_context(self, received_context):
    self.context = received_context
    # Do things with the context
Check and request focus for your app
User can switch from your app at any time, leaving it in the background. You won’t receive any key input in the meantime - the screen interactions will work as intended regardless of whether your app is the one active, but the actual screen won’t be updated with your images until the user switches back to your app. Here’s how to check whether your app is the one active, and request the context manager to switch to your app:
if not context.is_active():
    has_switched = context.request.switch()
    if has_switched:
        ... # Request to switch has been granted, your app is now the one active
Warning
Don’t overuse this capability - only use it when it’s absolutely necessary, otherwise the user will be annoyed. Also, keep in mind that your request might be denied.
Set a global key callback for your app
You can define a hotkey for your app to request focus - or do something else. This way, you can have a function from your app be called when a certain key is pressed from any place in the interface.
# Call a function from your app without switching to it
context.request_global_keymap({"KEY_F6":function_you_want_to_call})
# Request switch to your app
context.request_global_keymap({"KEY_F6":self.context.request_switch})
The request_global_keymap call returns a dictionary with a keyname as a key for each
requested callback, with True as the value if the key was set or, if an exception was
raised while setting the , an exception object.
Readability
When writing a ZPUI app, keep in mind that other people might refer to it afterwards, trying to understand how it works (possibly, also debugging).
How to arrange imports
One step towards readability is rearranging your import statements. Here’s something you might start with:
from ui import GraphicsPrinter # ZPUI libraries
import json # built-in library
import smbus # external library, needs to be installed
...
ZPUI-proposed way to arrange imports is:
- Built-in libraries
- ZPUI libraries
- External libraries (that you need to install from pip/apt)
- Local imports (something in the same folder as your
main.py
It’s best if you separate these groups with a single empty line. This is especially helpful once your app grows big. Here’s an example of the end result:
import json # built-in

from ui import GraphicsPrinter # ZPUI

import smbus # external

import smbus_funcs # local
...
Frequent mistakes
Using variables named i in a function-based app
If you decided to go the easy way and make a function-based app, do keep in mind
that they require global variables named i and o. Therefore, if you use
constructs like this in a function:
for i in range(8):
    print(i) # do stuff
the local i will overwrite the global i variable locally. So, this code:
for i in range(8):
    print(i)
Printer("Done!", i, o) # this will fail
will fail. Solutions? Don’t use i as a local name in the same function where you’ll
need to access the global i. Also, class-based apps won’t suffer from this (admittedly
minor) flaw.
Dynamically building lists/dictionaries with lambdas
If you’re dynamically building contents of a menu/listbox/whatever (for example, using
a for loop or a list/dictionary comprehension), you will likely need to use lambdas,
like this:
interfaces = ["eth0", "wlan0", "lo0"]
# No! Bad!
menu_contents = [[if_name, lambda: show_ip(if_name)] for if_name in interfaces]
Menu(menu_contents, i, o).activate()
However, the lambdas constructed will not refer to the if_name by value - instead,
it’s referred by its name and the value will only be resolved at runtime when the
lambda is called. So, all the show_ip lambdas constructed will execute with
"lo0" as their first argument (the last value that the if_name variable
was assigned). There’s a workaround - you can create a temporary keyword argument
for the lambda with the default value of if_name:
interfaces = ["eth0", "wlan0", "lo0"]
# The right way
menu_contents = [[if_name, lambda x=if_name: show_ip(x)] for if_name in interfaces]
Menu(menu_contents, i, o).activate()
This way, a temporary variable is created, and the if_name variable is copied into
it by value at list generation time, so the resulting lambda will use the proper value
as the positional argument.