App writing tutorial 2: Dice Roll
Do you want to see a walkthrough on how to draw arbitrary things on the screen,
not limited to elements like Menu and DialogBox and such?
This page is for you =)
Here’s how you develop a simple ZPUI application - a pair of virtual dice. You want to use a Linux PC of some sort; WSL could work, I imagine. If you’re developing for the Beepy/Blepis, you can develop and test directly on them through SSH. If developing on a Linux PC, install the emulator.
We’ll be developing this app for a Blepis/Beepy screen, at least initially.
For this, you’ll want to add a resolution: 320x240 (or 400x240) line
into your ZPUI emulator config.yaml file, and test run ZPUI to see that the default resolution has indeed been changed.
Setup
In the console, do this:
git clone https://github.com/ZeroPhone/zpui-example-app/ zpui-diceroll
cd zpui-example-app
python3 rename.py zpui_diceroll
This downloads a ZPUI app template and renames it. From here, you can edit the app metadata, adding your name and maybe email instead of mine, and install it:
nano pyproject.toml
python install.py
Now, you can launch (or restart) ZPUI to have your newly installed app load. You won’t need to re-run the setup command, as code changes will be picked up on each ZPUI startup. Also, the app will have example code - we won’t need to reuse much of it, but it’s a decent reference for your own forays.
Editing the code
The app code is found in src/zpui_diceroll/app.py. Here’s two things you’ll want to change first:
menu_name- we’ll put “Dice roll” in theremodule_path- a directory to put the app in. Our app will fit best in the “Utilities” main menu directory - check here, and you can see that the right path is"utils/".
Now, feel free to cut out test(self) and get_text(self) function blocks, as well as the entirety of the on_start(self) block contents.
We don’t need to initialize any resources, which means init_app() can remain empty, or you can even delete it.
The only place we need to put our code is inside the now emptied on_start().
Dice have to be drawn on the screen. The easiest way to draw things is by using the Canvas we have in zpui_lib.
At the top, add Canvas to the end of the from zpui_lib.ui import line - and add a from time import sleep line there while at it.
from zpui_lib.ui import Canvas # old Printer and Menu imports got removed
from time import sleep
Then, in on_start(), put this:
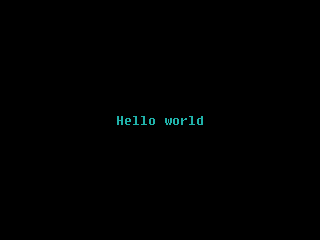
def on_start(self):
    c = Canvas(self.o) # self.o is an output object for UI elements to use
    c.centered_text("Hello world", font=("Fixedsys62.ttf", 16))
    c.display() # necessary for Canvas to draw onto screen
    sleep(3)
Wonderful! Save the file, then launch (or restart) ZPUI, find the “Dice roll” app in the “Utilities” directory, and click it. It will show up a “Hello world” on the screen, and then exit after 3 seconds (or earlier if you press the left button).
Let’s draw a rectangle on the canvas instead. Remove the centered_text line, and replace it with c.rectangle_wh((20, 20, 30, 30), fill=c.default_color). That’s a good start, giving us a 30x30 filled rectangle in the top left corner, with its top left corner at (20, 20) point.

Let’s put dice drawing code into a function instead.
def draw_dice(self, c, size=70, start_x=10, start_y=10, value=1, r=5):
    c.rectangle_wh((start_x, start_y, size, size), fill=c.default_color)

...
# then, in on_start():
    self.draw_dice(c, value=2)
    c.display()
That will give us a similar result (70x70 rectangle in the top left corner at (10, 10) ),
but this way, we can easily change the size and the position of the dice - which helps if we want to draw two dice being rolled, and we do.

(this is not a 70x70 rectangle, but I hope you can forgive me for not having the best screenshot)
Now, in draw_dice, after the rectangle_wh call, let’s add code to draw the dice circles for values from 1 to 6:
c_x = int(start_x + size//2); c_y = int(start_y + size//2)
color = c.background_color
x1 = c_x - (c_x-start_x)//2; y1 = c_y - (c_y-start_y)//2 # top left circle coordinates
x2 = c_x + (c_x-start_x)//2; y2 = c_y + (c_y-start_y)//2 # bottom right circle coordinates
if value in (1, 3, 5): # the center circle
    c.circle((c_x, c_y, r), outline=color, fill=color)
if value in (2, 3, 4, 5, 6):
    # draw top left and bottom right circles, like this: `-,
    c.circle((x1, y1, r), outline=color, fill=color)
    c.circle((x2, y2, r), outline=color, fill=color)
if value in (4, 5, 6):
    # now, draw bottom left and top right circles, too
    c.circle((x1, y2, r), outline=color, fill=color)
    c.circle((x2, y1, r), outline=color, fill=color)
if value == 6:
    # only 6 needs the center-left and center-right circles
    c.circle((x1, c_y, r), outline=color, fill=color)
    c.circle((x2, c_y, r), outline=color, fill=color)
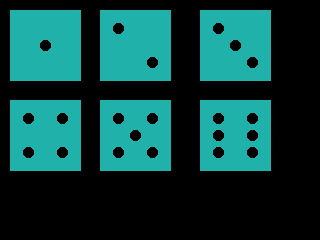
In on_start(), you could write a loop that neatly positions the dice on the screen, but for testing, it’s sufficient to do this:
self.draw_dice(c, start_x=10, start_y=10, value=1)
self.draw_dice(c, start_x=100, start_y=10, value=2)
self.draw_dice(c, start_x=200, start_y=10, value=3)
self.draw_dice(c, start_x=10, start_y=100, value=4)
self.draw_dice(c, start_x=100, start_y=100, value=5)
self.draw_dice(c, start_x=200, start_y=100, value=6)
These yield us a pretty picture:
Input processing
So far, we’ve only done output, but you’d highly benefit from knowing a simple way to handle input, too. Get ExitHelper from zpui_lib.helpers:
from zpui_lib.helpers import setup_logger, local_path_gen, ExitHelper # adding to line 1 of app.py
In on_start(), you’ll want to create an ExitHelper, and add an idle loop using it in the end of your on_start() code:
[... our dice drawing code ...]
# remove the sleep(3)
eh = ExitHelper(self.i).start()
while eh.do_run():
    sleep(0.1)
ExitHelper’s main feature is letting your code run (or, more commonly, idle) up until you press "Left".
You can even do some rudimentary key processing with it, as you can
see in the Flashlight app code.
Note
Apps can already “exit” on Left press by default, up until you map the Left key to something else, but that’s a failsafe -
it simply de-focuses the app instead of stopping your code that’s running in it,
and it’s intended to prevent app hangs and crashes from making ZPUI become unusable.
With this addition, the dice will be shown on the screen up until you press Left, not just for 3 seconds at a time like before.
This is more than good enough for simple apps.
def on_start(self):
    eh = ExitHelper(self.i).start()
    c = Canvas(self.o) # self.o is an output object for UI elements to use
    self.draw_dice(c, start_x=10, start_y=10, value=1)
    self.draw_dice(c, start_x=100, start_y=10, value=2)
    self.draw_dice(c, start_x=200, start_y=10, value=3)
    self.draw_dice(c, start_x=10, start_y=100, value=4)
    self.draw_dice(c, start_x=100, start_y=100, value=5)
    self.draw_dice(c, start_x=200, start_y=100, value=6)
    c.display()
    while eh.do_run():
        sleep(0.1)
Finalizing the app
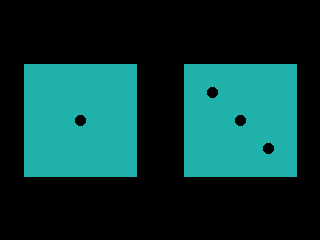
Let’s round this up with actually generating a pair of randomly rolled dice, every time you open the app.
At the top of the app file, add from random import choice.
Then, let’s split the screen in half, and draw two dice - one on the left, and one on the right,
scaling the dice to the size of the screen available.
def on_start(self):
    c = Canvas(self.o)
    # let's calculate dice coordinates here
    cx, cy = c.get_center() # cx is centerpoint x, which means it's == width of half of the screen
    # so, let's pick the smallest fitting side for our screen,
    # and shrink it so that there's comfortable borders on the sides.
    # For a 320x240 screen, that'll be 112, which fits well enough
    dice_size = int(min(self.o.height, cx)*0.7)
    y = (self.o.height-dice_size)//2
    x1 = (cx-dice_size)//2; x2 = x1 + cx
    # we have the coordinates!
    d1 = choice(range(1, 7))
    d2 = choice(range(1, 7))
    self.draw_dice(c, start_x=x1, start_y=y, value=d1)
    self.draw_dice(c, start_x=x2, start_y=y, value=d2)
    c.display()
    eh = ExitHelper(self.i).start()
    while eh.do_run():
        sleep(0.1)
ZPUI isn’t big on animations, but for the sake of a tutorial, we can try and add one! The simplest animation possible is to scroll through dice values for a second before showing the final one, which we can easily achieve by rewriting our code like this:
[...]
# we have the coordinates!
for i in range(11):
        d1 = choice(range(1, 7))
        d2 = choice(range(1, 7))
        self.draw_dice(c, size=dice_size, start_x=x1, start_y=y, value=d1)
        self.draw_dice(c, size=dice_size, start_x=x2, start_y=y, value=d2)
        c.display()
        sleep(0.02)
    [... code continues with ExitHelper ...]
Note
This animation’s framerate (and the resulting delay) will depend on CPU performance, since on lower-power devices, canvas operations can be surprisingly
heavy (especially once text rendering is involved). This will likely mean it will be fast on emulator, but it could get slow on Pi Zero 1-powered devices.
If you run into this issue and want to negate it, instead of drawing rectangles and circles anew every time, you can pre-generate & cache dice roll
images and then paste them onto the canvas, like the BebbleGridView ZPUI main menu does for Beepy/Blepis resolutions.
As an aside - with very few changes (dynamically calculating instead of hardcoding circle radius), the app works on 128x64 screens, too!

You can find the resulting app code here, but you might’ve noticed you don’t need to install it - the app is now available in ZPUI stock. By the time you visit its code in the ZPUI repo, you could very well find it to have gained features!
Hope this tutorial has been useful, and, let me know if anything has been unclear.
Note
Currently, ZPUI’s UI output capabilities don’t compare well to i.e. those of LVGL, and neither does it provide a markup language. It does currently provide enough graphics primitives to design a variety of basic UIs, and work on more complex UI constructs is being done as more applications are developed. Feedback and contributions are welcome!